ヘビゲームを作る-2
前回はヘビを操作するところまで実装しました
processing-p5.hateblo.jp
今回はエサを食べてヘビが成長する機能と,ゲームオーバーの機能を追加します
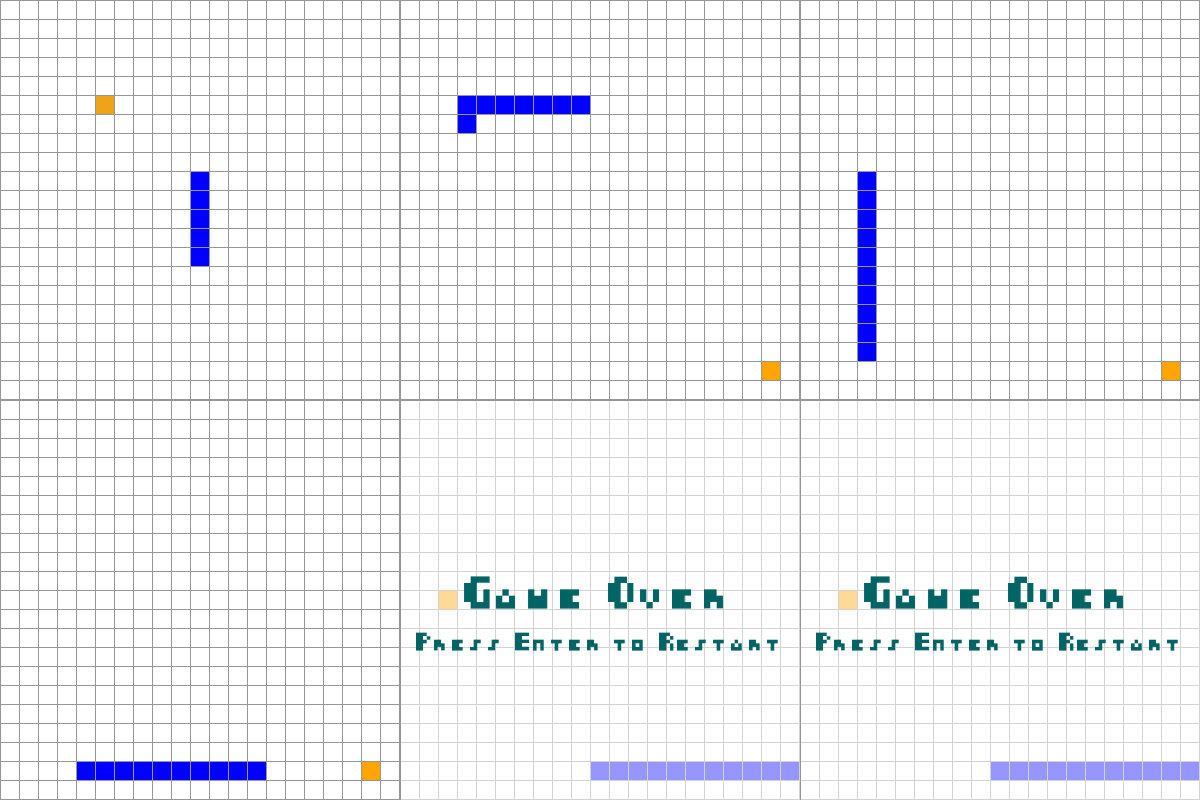
下図が今回作成するアプリの様子です

コードの全体像は以下のようになりました
boolean GameOver = false;
int col_num = 21;
int row_num = 21;
int snake_size = 5; // ヘビの長さの初期値
int snake_add_size = 5; // ヘビの成長サイズ
ArrayList<PVector> snake = new ArrayList<PVector>();
PVector food = new PVector(5, 5); // エサの初期配置
PVector velocity = new PVector(0, -1); // ヘビの進行速度の初期値

void setup(){
  PFont font = createFont("4x4kanafont.ttf", 32, true);
  textFont(font);
  textAlign(CENTER, CENTER);
  frameRate(10);
  size(400, 400);
  stroke(150);
  initiateSnake();
}

void draw(){
  background(255);
  updateSnake();
  displayCells();

  // ゲームオーバー時の画面表示
  if(GameOver){
    fill(255, 255, 255, 150);
    rect(0, 0, width, height);
    fill(0, 100, 100);
    textSize(32);
    text("Game Over", width/2, height/2-10);
    textSize(18);
    text("Press Enter to Restart", width/2, height/2 + 40);
    noLoop();
  };
}

void displayCells(){
  float c_x = width/col_num; // セルサイズ
  float c_y = height/row_num;

  // 全てのセルの描画
  fill(255);
  for(int i=0; i<col_num; i+=1){
    for(int j=0; j<row_num; j++){
      rect(i*c_x, j*c_y, c_x, c_y);
    }
  }
  // snakeの描画
  fill(0, 0, 255);
  for(int i=0; i<snake.size(); i++){
    rect(snake.get(i).x * c_x, snake.get(i).y * c_y, c_x, c_y);
  }
  // エサの描画
  fill(255, 165, 0);
  rect(food.x*c_x, food.y*c_y, c_x, c_y);
}

void initiateSnake(){ // ヘビの初期設定を行う関数
  if(snake.size()>0){
    snake.clear();
  }
  snake_size = 5;
  velocity.set(0, -1);
  for(int i=0; i<snake_size; i++){
    snake.add(new PVector(10, 10+i)); // 蛇の初期状態
  }
}

void updateSnake(){ // ヘビの更新を行う関数
  for(int i=snake_size-1; i>0; i--){
    snake.get(i).x = snake.get(i-1).x;
    snake.get(i).y = snake.get(i-1).y;
  }
  snake.get(0).add(velocity);
  snake.get(0).x = constrain(snake.get(0).x, 0, col_num-1);
  snake.get(0).y = constrain(snake.get(0).y, 0, row_num-1);

  // エサを食べたらヘビ成長 & 新しいエサ出現
  if(snake.get(0).dist(food) == 0){
    for(int i=0; i<5; i++){
      snake.add(new PVector(snake.get(snake_size-2).x, snake.get(snake_size-2).y));
    }
    snake_size += snake_add_size;
    food.set(int(random(1,col_num)), int(random(1, row_num)));
  }

  // ヘビの体が衝突したらゲームオーバー
  for(int i=1; i<snake.size(); i++){
    if(snake.get(0).dist(snake.get(i)) == 0){
      GameOver = true;
    }
  }
}

void keyPressed(){
  switch(keyCode){
    case UP:
          velocity.set(0, -1);
          break;
    case DOWN:
          velocity.set(0, 1);
          break;
    case LEFT:
          velocity.set(-1, 0);
          break;
    case RIGHT:
          velocity.set(1, 0);
          break;
    case ENTER:
          if(GameOver){
            loop();
            GameOver = false;
            initiateSnake();
          }
          break;
  }
}
まずはゲームオーバーの状態を定義します
ヘビゲームでは,ヘビの頭が体の一部に重なってしまうとゲームオーバーとなるので,そのように記述します
boolean GameOver = false;

void updateSnake(){ // ヘビの更新を行う関数
  // ヘビの体が衝突したらゲームオーバー
  for(int i=1; i<snake.size(); i++){
    if(snake.get(0).dist(snake.get(i)) == 0){
      GameOver = true;
    }
  }
}
上のコードでは,ゲームオーバーかどうかの状態を格納する変数として,boolean型変数GameOverを定義しています
ヘビの状態を更新する関数updateSnake()中において,ヘビの体が重なった場合にはGameOverにtrueを格納します
次に,ゲームオーバー時の画面表示についての記述は以下のようにしています
void setup(){
  PFont font = createFont("4x4kanafont.ttf", 32, true);
  textFont(font);
  textAlign(CENTER, CENTER);
}

void draw(){
  // ゲームオーバー時の画面表示
  if(GameOver){
    fill(255, 255, 255, 150);
    rect(0, 0, width, height);
    fill(0, 100, 100);
    textSize(32);
    text("Game Over", width/2, height/2-10);
    textSize(18);
    text("Press Enter to Restart", width/2, height/2 + 40);
    noLoop();
  };
}

void keyPressed(){
  switch(keyCode){
    case ENTER:
          if(GameOver){
            loop();
            GameOver = false;
            initiateSnake();
          }
          break;
  }
}
Processingのキャンバス上で文字を描画したい時はPFontクラスを用います
今回はピクセル風のフォントを使いたかったので,4x4kanafont.ttfをwebからダウンロードして,processingのdataフォルダにあらかじめ保存しています
変数GameOverの値がtrueのときは画面上に"Game Over"の文字列が表示されます
また,GameOverの値がtrueのときにEnterキーを押すと,ゲームが再開できるように記述しています
次にエサの記述についてです
int snake_size = 5; // ヘビの長さの初期値
int snake_add_size = 5; // ヘビの成長サイズ
PVector food = new PVector(5, 5); // エサの初期配置

void displayCells(){
  // エサの描画
  fill(255, 165, 0);
  rect(food.x*c_x, food.y*c_y, c_x, c_y);
}

void updateSnake(){ // ヘビの更新を行う関数
  // エサを食べたらヘビ成長 & 新しいエサ出現
  if(snake.get(0).dist(food) == 0){
    for(int i=0; i<5; i++){
      snake.add(new PVector(snake.get(snake_size-2).x, snake.get(snake_size-2).y));
    }
    snake_size += snake_add_size;
    food.set(int(random(1, col_num-1)), int(random(1, row_num-1)));
  }
}
エサの座標を格納する変数として,PVector型の変数foodを定義しています
また,エサを食べたときにヘビの体がどれくらい伸びるのかについて,snake_add_sizeとして定義します
ヘビの更新を行う関数updateSnake()中において,ヘビの頭とエサとの距離が0になった=エサを食べたときに体を伸長させる処理を記述します
同時に,エサを食べたときに, 新しいエサを出現させる処理を記述しています
今回でヘビゲームの基本的な要素を全て実装することができました
上のコードを基本形として,色や図形を変えたり,3D画面にしてみたり,様々なバリエーションを考えてみましょう
